Screenshots in this guide reflect a previous version of the UI. We’ll update them soon. The core flows and concepts remain the same.
Table of contents
Borrow Dashboard
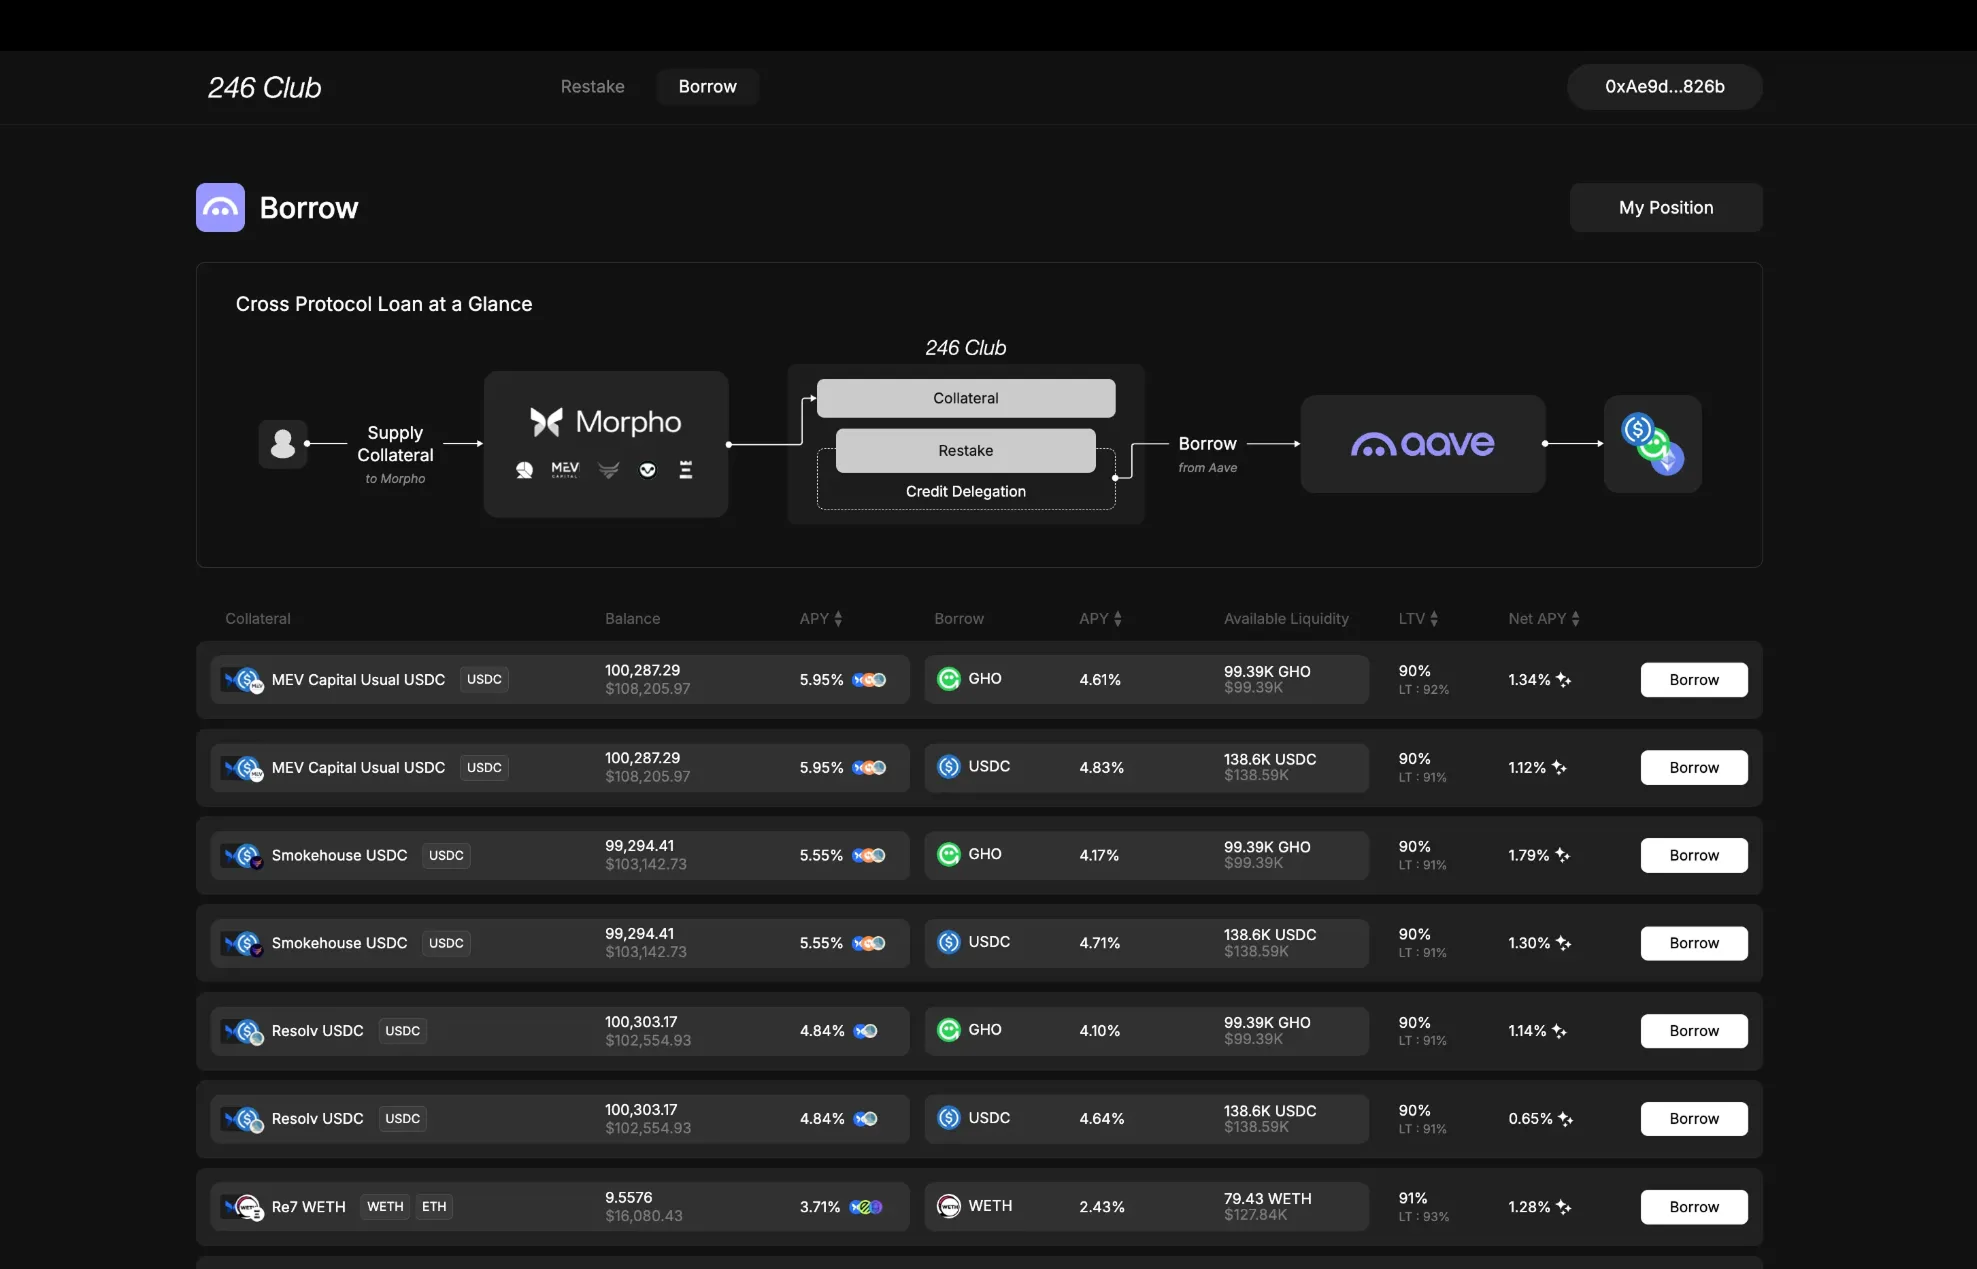
Collateral Section
Collateral Column
- Vault Position (e.g., a Morpho lending position like Smokehouse USDC)
- and the underlying asset (e.g., USDC or ETH), which you can zap into a vault position directly from the UI.
- Deposit your underlying asset into the respective Morpho vault.
- Mint the vault receipt token.
- Use that receipt as collateral—automatically.
End result is the same: whether using a vault you already hold or zapping in from an underlying asset, the position becomes your collateral.
( Collateral ) Balance Column
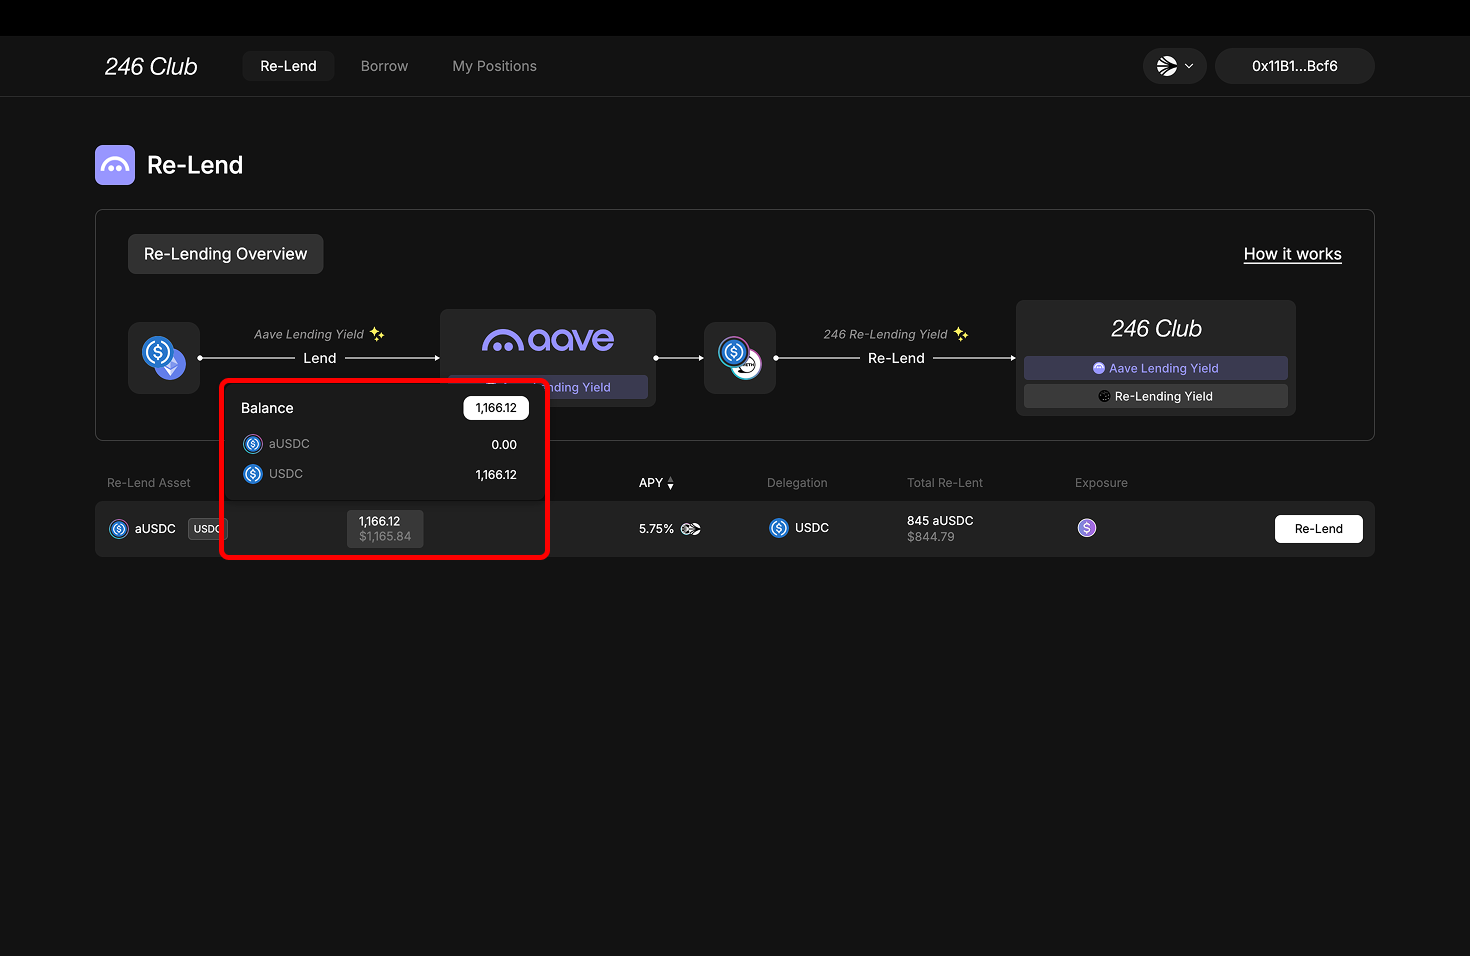
- Your balance of the vault receipt token (e.g., Smokehouse USDC)
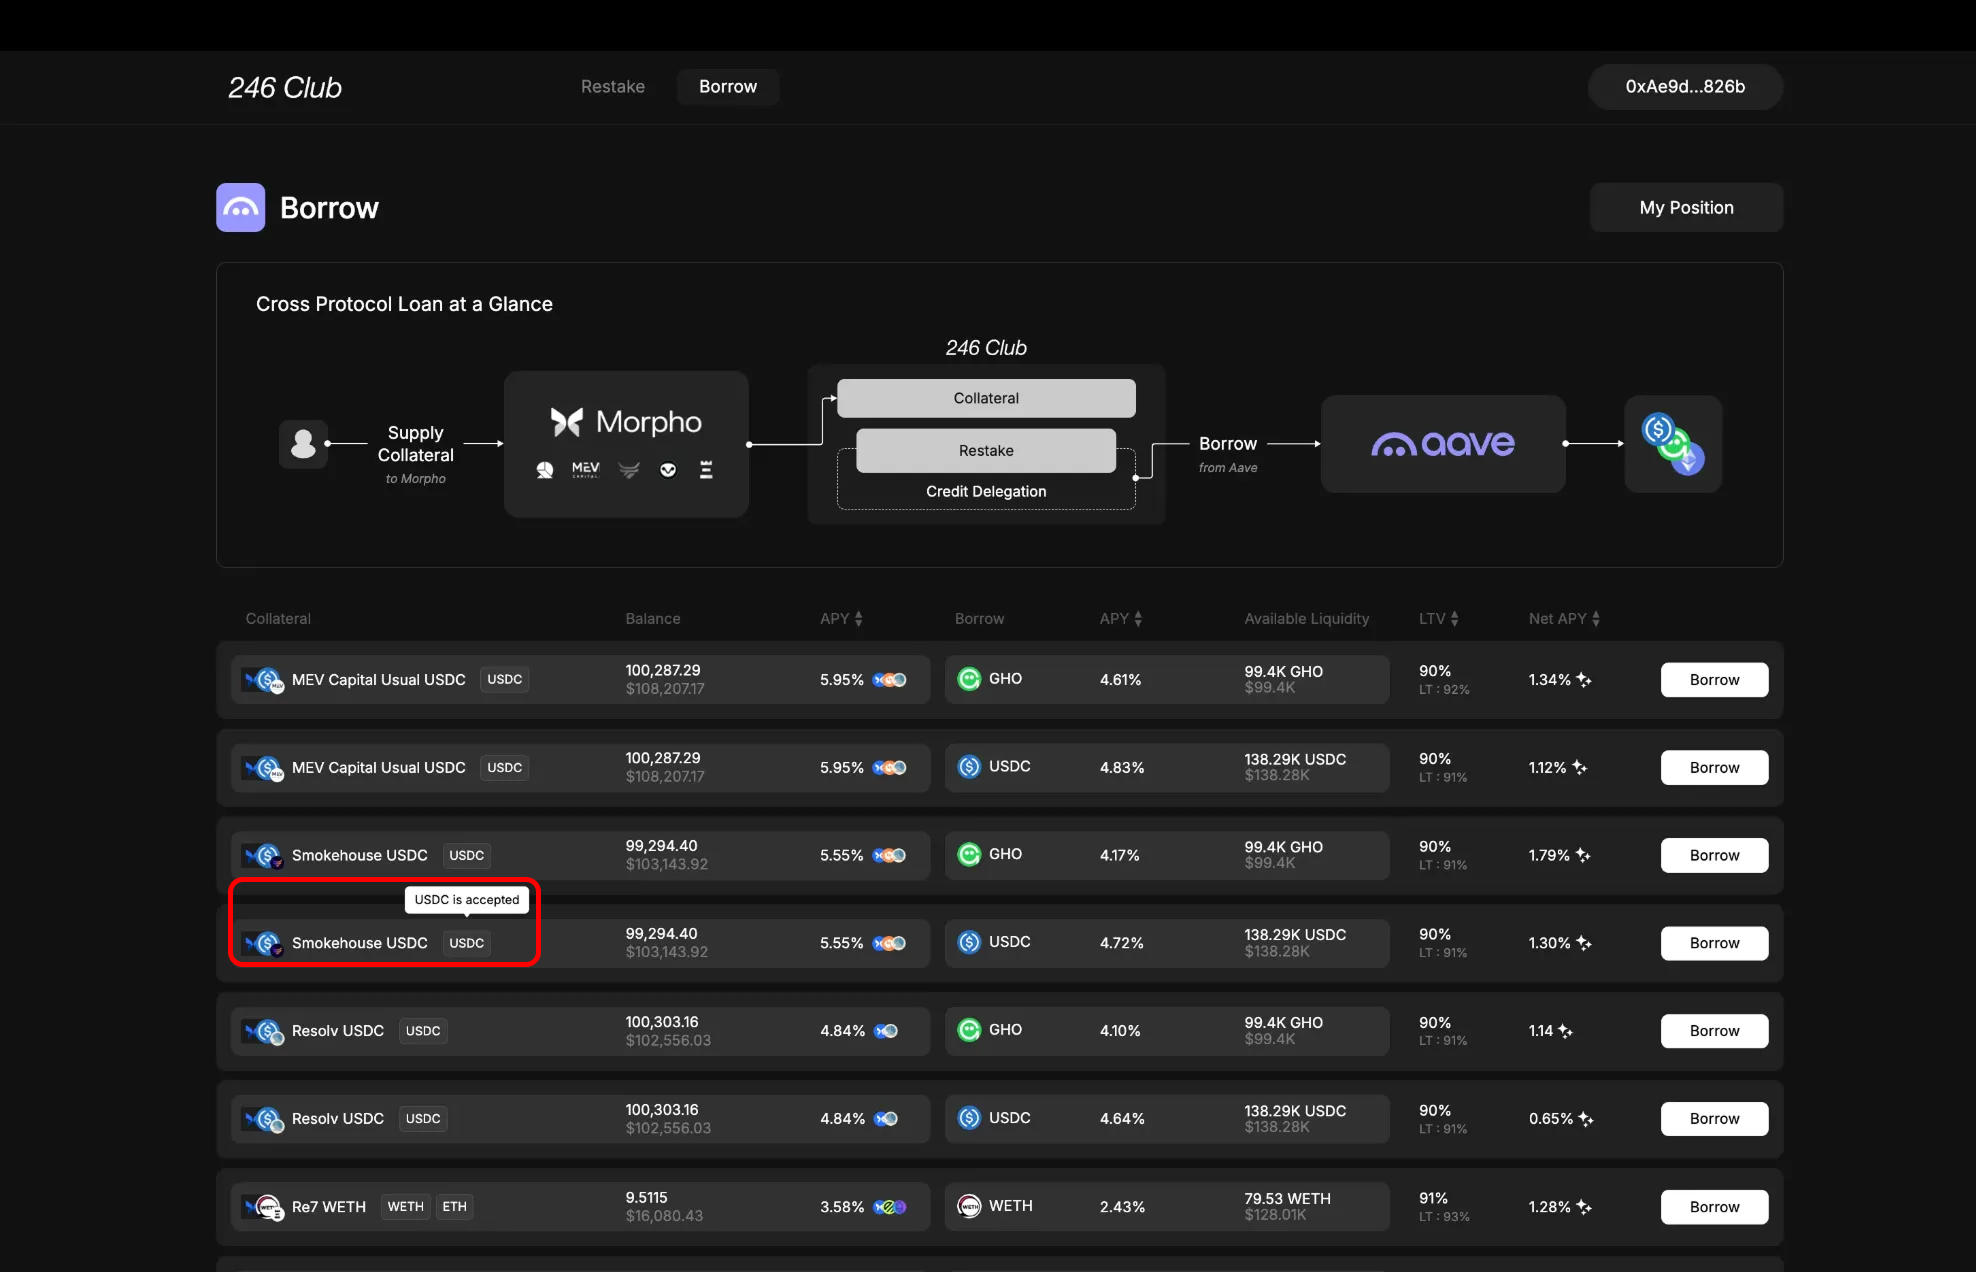
- Your balance of the underlying asset (e.g., USDC)
- Total combined amount available for collateral use
( Collateral ) APY Column
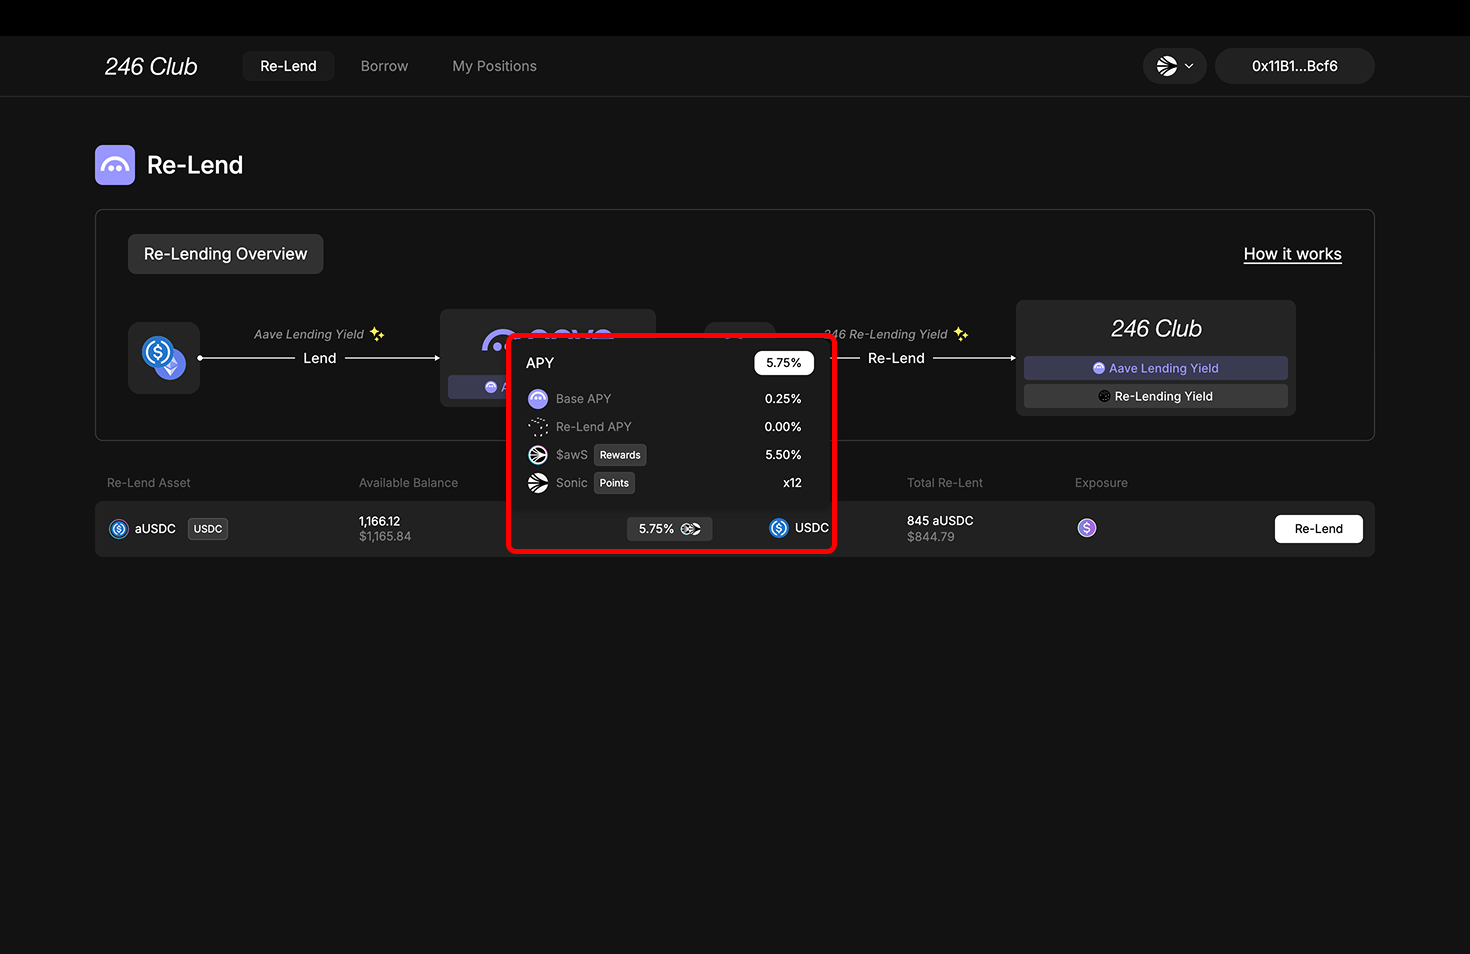
- Native APY: Base yield from the Vault used as collateral ( e.g. Lending yield from Morpho )
- Reward APY: Additional rewards (e.g., $MORPHO incentives)
- Points: Points earned from the vault (e.g., Resolv points)
- Combined APY: Total of all the above
Borrow Section
Borrow / APY / Liquidity / LTV
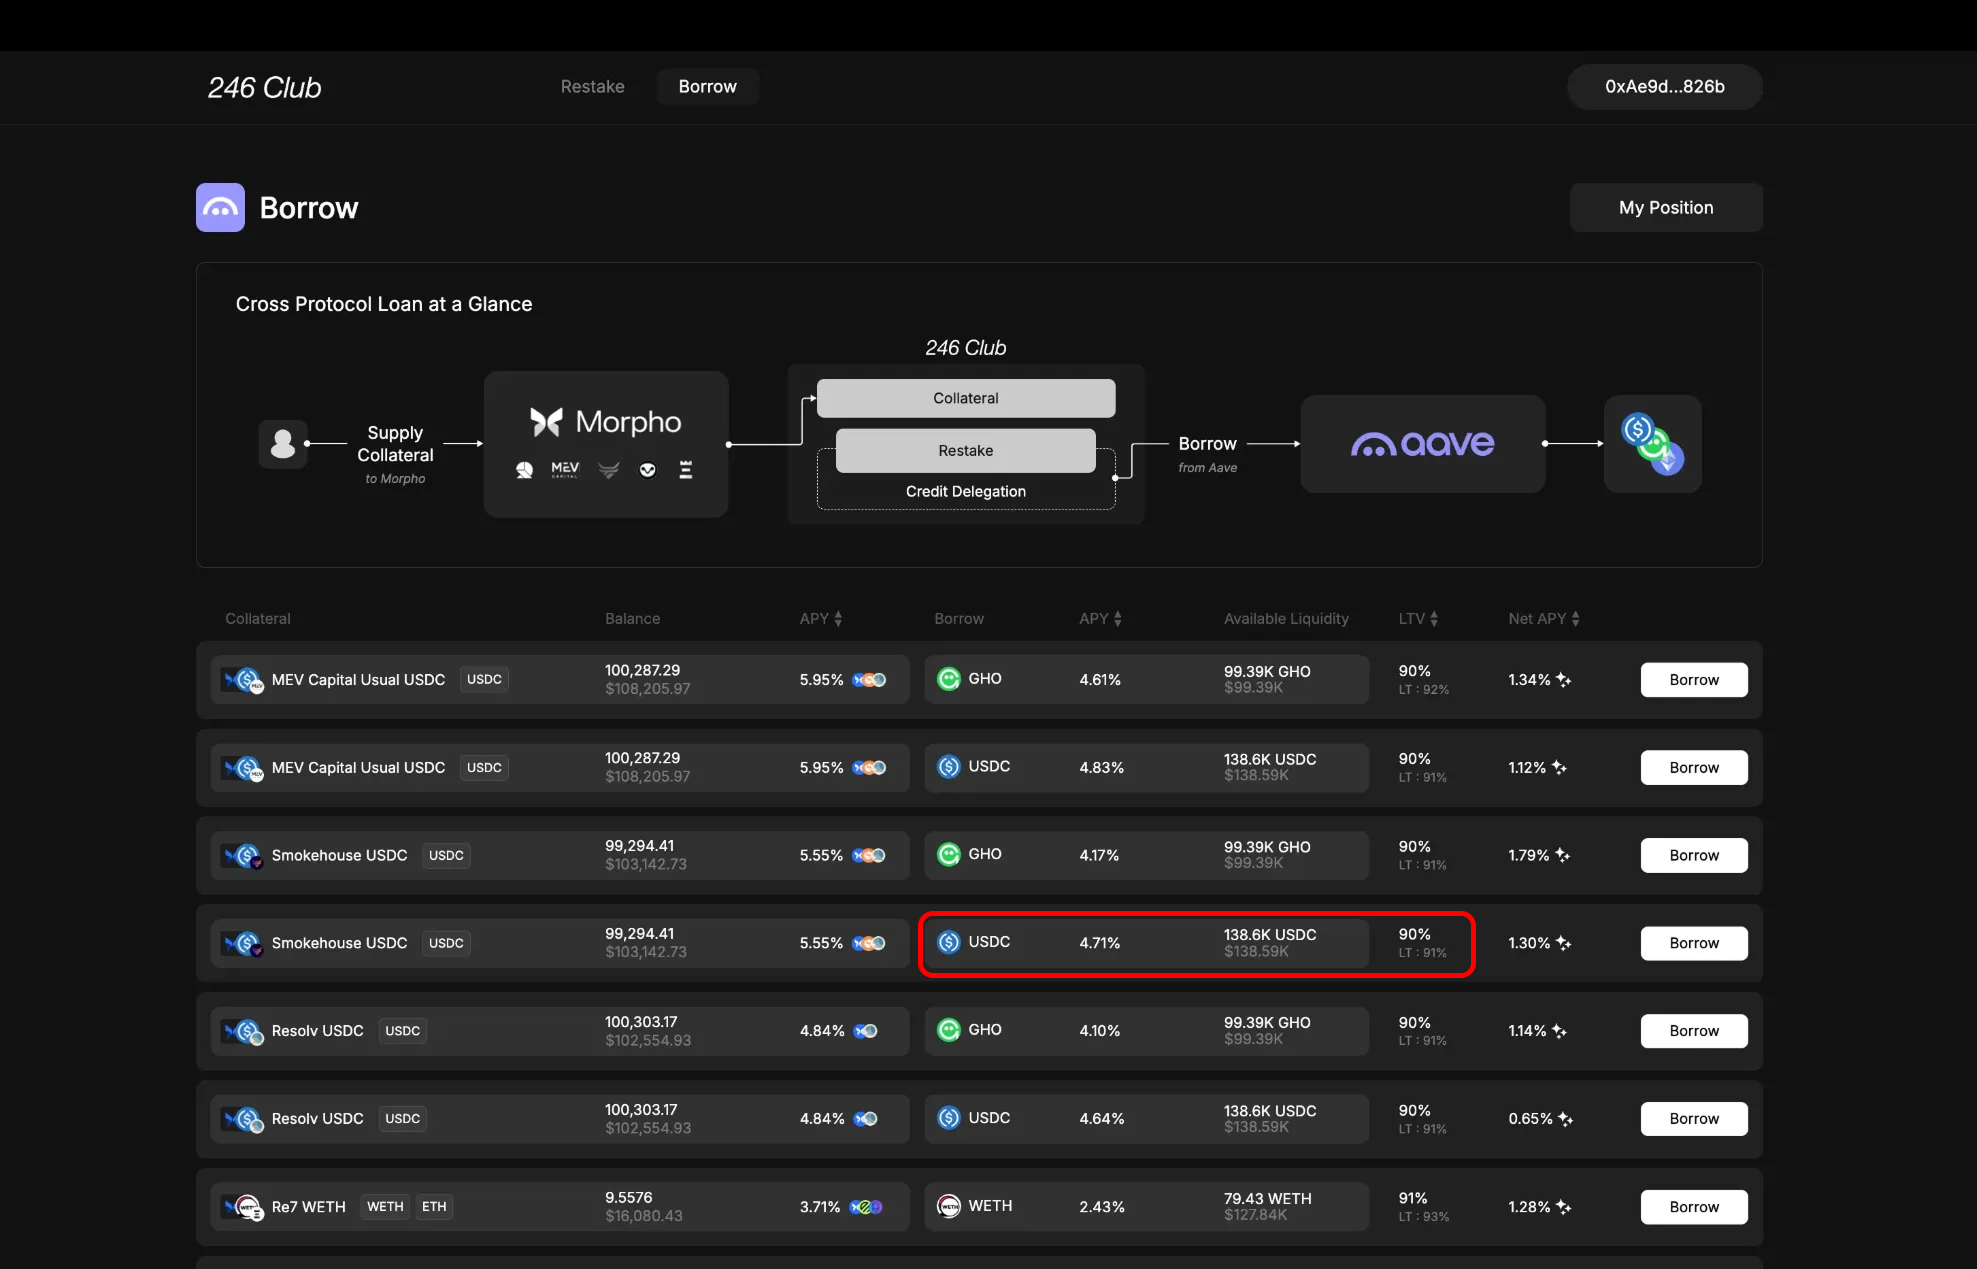
- Borrow Column: Asset you can borrow
- APY Column: The interest rate you’ll pay. This includes Aave’s base rate and an additional 246Club-specific rate. More on the rate model
- Available Liquidity: Maximum borrowable amount left for this pair
- LTV: Maximum borrow ratio you can take. Below that, the Liquidation Threshold (LT) is displayed. Learn how to manage LTV and LT
Net APY Column
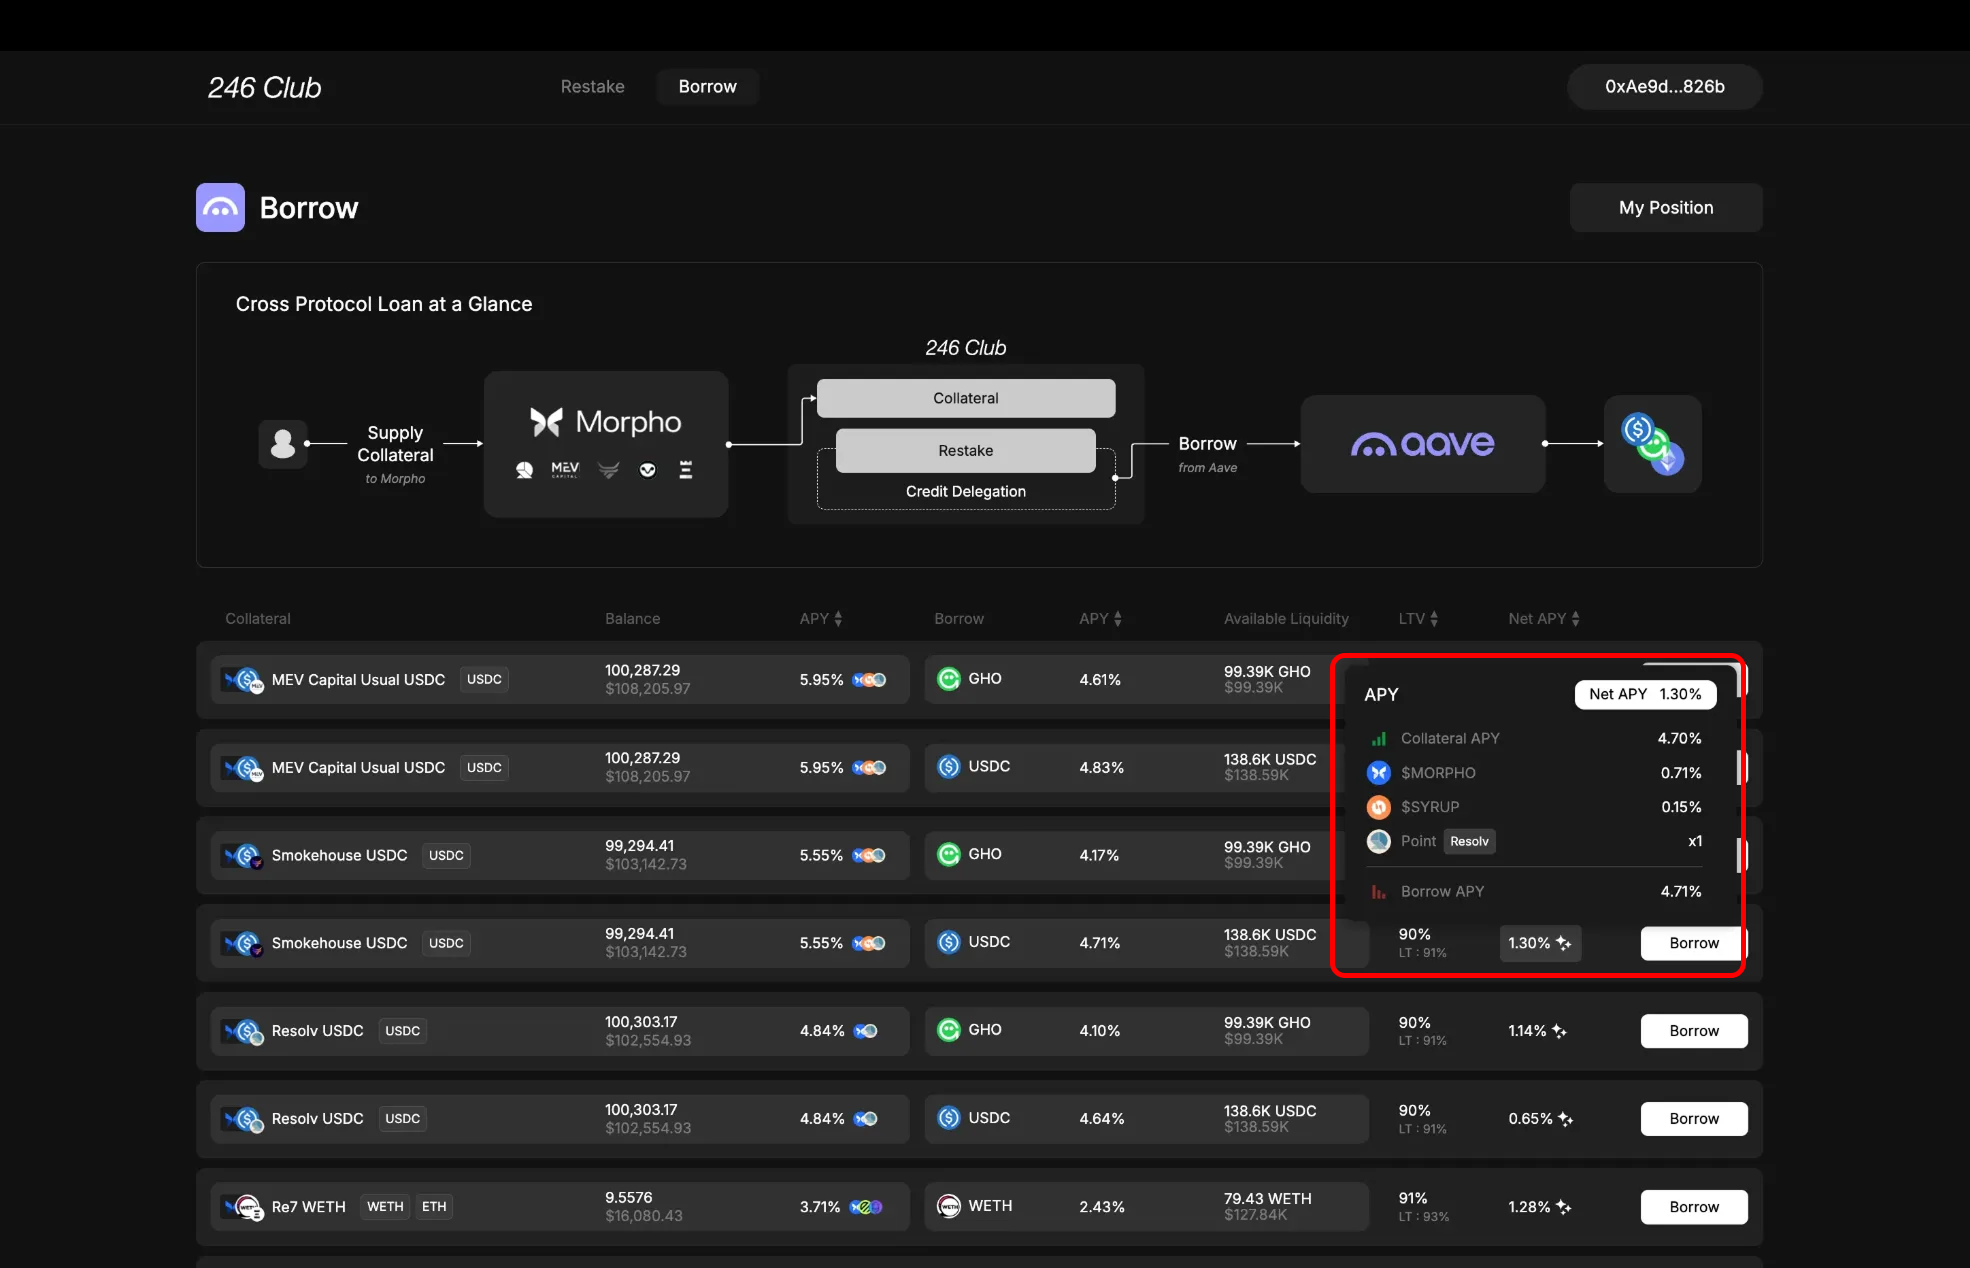
- Collateral APY: The base supply rate you earn from supplying the asset to Morpho vaults.
- Reward APY: The additional reward you earn from Morpho by supplying to that vault(e.g., $MORPHO)
- Points: The points multiplier you get from the Vault by supplying(e.g., Resolv points)
- Borrow APY: The apy displayed from APY column of delegation asset.
- Net APY
Borrow Modal
Clicking the Borrow button opens a modal with three sections: Collateral, Borrow, and Summary.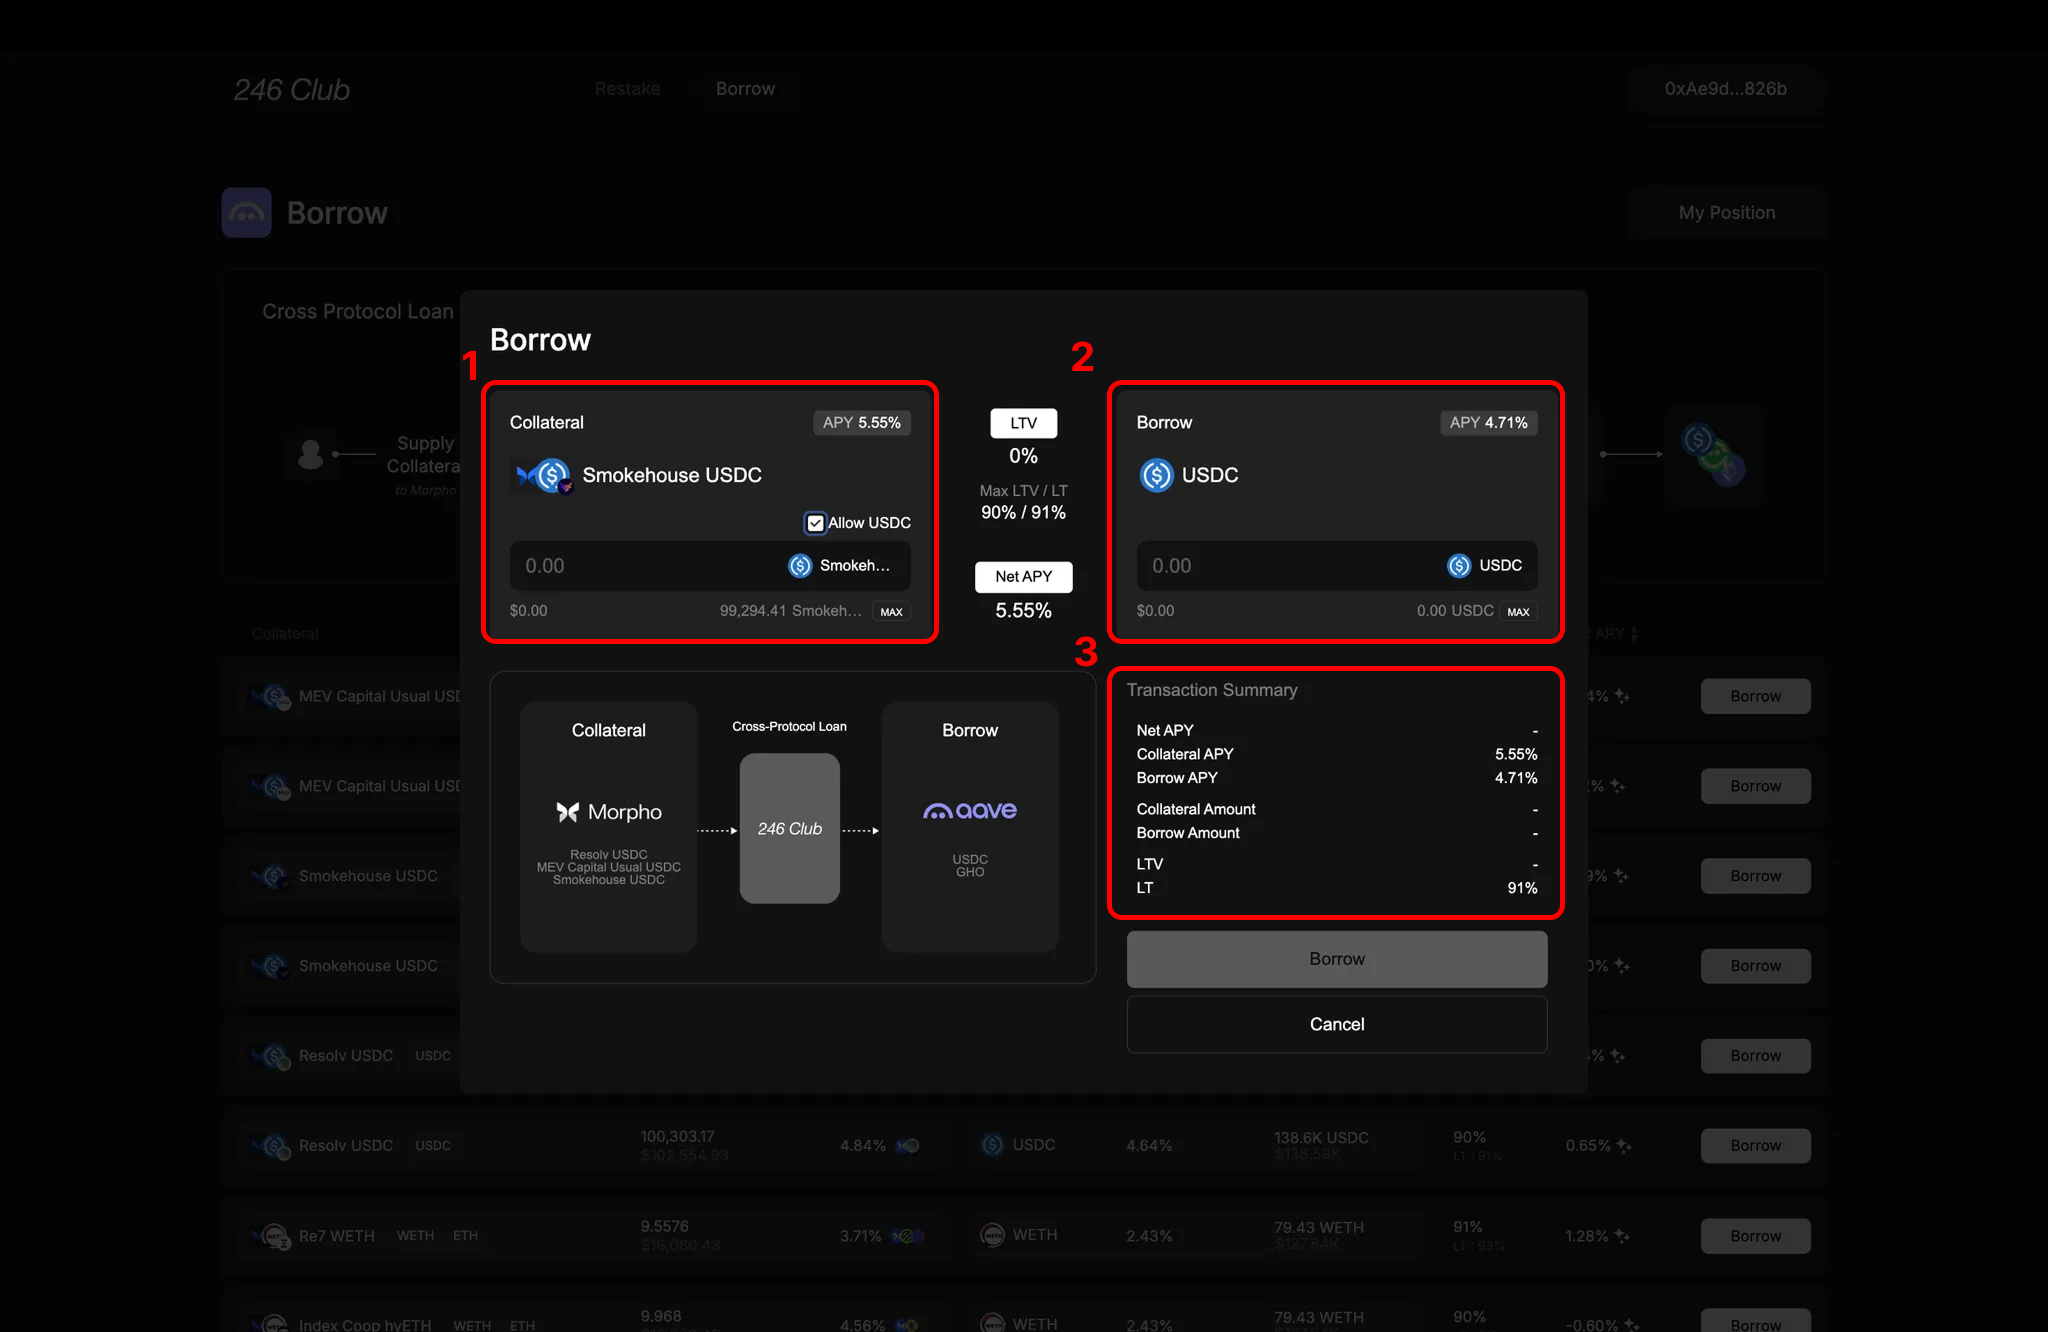
1. Collateral Box
- Shows the selected collateral and allows you to input how much to deposit.
- You can enable “Allow USDC” to use USDC (or other underlying assets) directly to zap into the vault.
- Clicking Max fills in your maximum depositable amount, depending on whether the underlying asset is enabled.
2. Borrow Section
- Shows the selected borrow asset and allows you to input how much to borrow.
- You can borrow up to: Collateral Value × Max LTV
- Clicking Max auto-fills the maximum borrowable amount.
3. Summary Section
Displays a real-time summary based on the input amount of collateral and borrow :- Total Collateral Supplied
- Total Amount Borrowed
- Current LTV
- Final Net APY
Borrow Modal - Leverage
Leverage mode automates the borrowing and collateral depositing process based on your chosen leverage ratio. The modal has three sections: Position, Leverage, and Summary.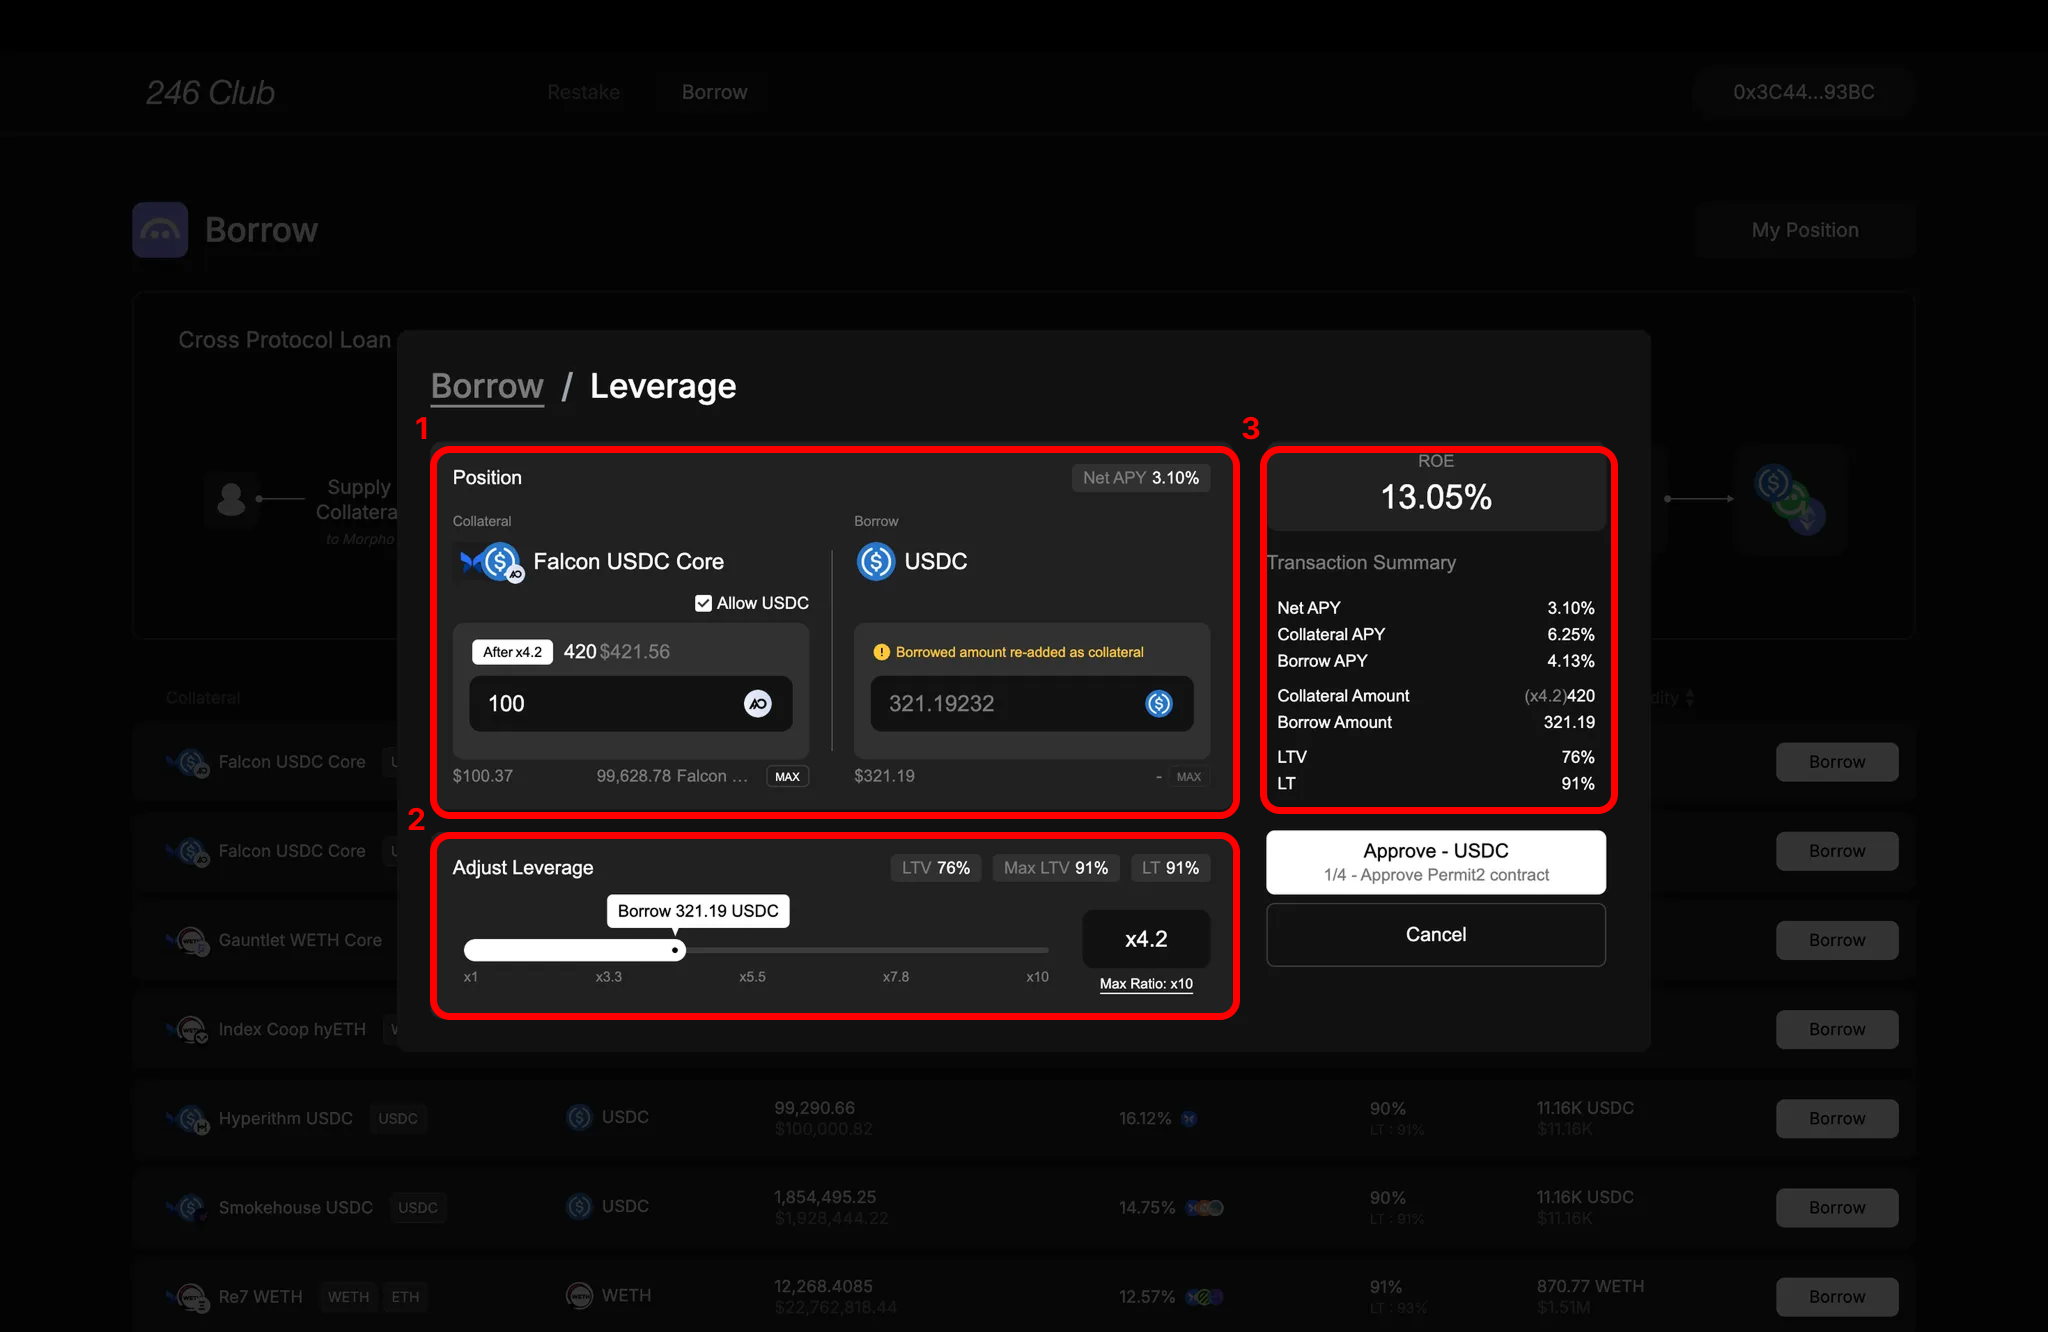
1. Position Box
- Shows the selected collateral and borrow asset pair.
- You can enable “Allow USDC” to use USDC (or the underlying asset) to zap directly into the vault.
- Clicking Max fills in your maximum depositable amount.
In leverage mode, you only input how much collateral (or underlying asset) you want to deposit. The borrow amount is calculated automatically based on your selected leverage ratio.For example, if you deposit 900 and adds it to your collateral to reach a $1,000 position.
- Net APY is shown at the top-right of the box, reflecting your yield without leverage.
2. Leverage Box
- Set your desired Leverage Ratio using the slider.
-
The maximum ratio is determined by the selected pair’s Max LTV, calculated as:
1 / (1 - LTV)For example, with 90% LTV:1 / (1 - 0.9) = 10× max leverage. - As you increase the ratio, the LTV of the position rises. The current LTV is shown in the top-right of the box.
You cannot exceed Max LTV, but you should still size your leverage based on your own risk preference.
3. Summary Section
- ROE is shown first — this is your Net APY multiplied by the Leverage Ratio.
- Real-time updates reflect changes to inputs and leverage settings:
- Net APY
- Total Collateral Supplied (including borrowed and re-added amounts)
- Total Amount Borrowed
- Current LTV after leverage is applied
My Position
After a successful transaction, you’re redirected to the My Position page.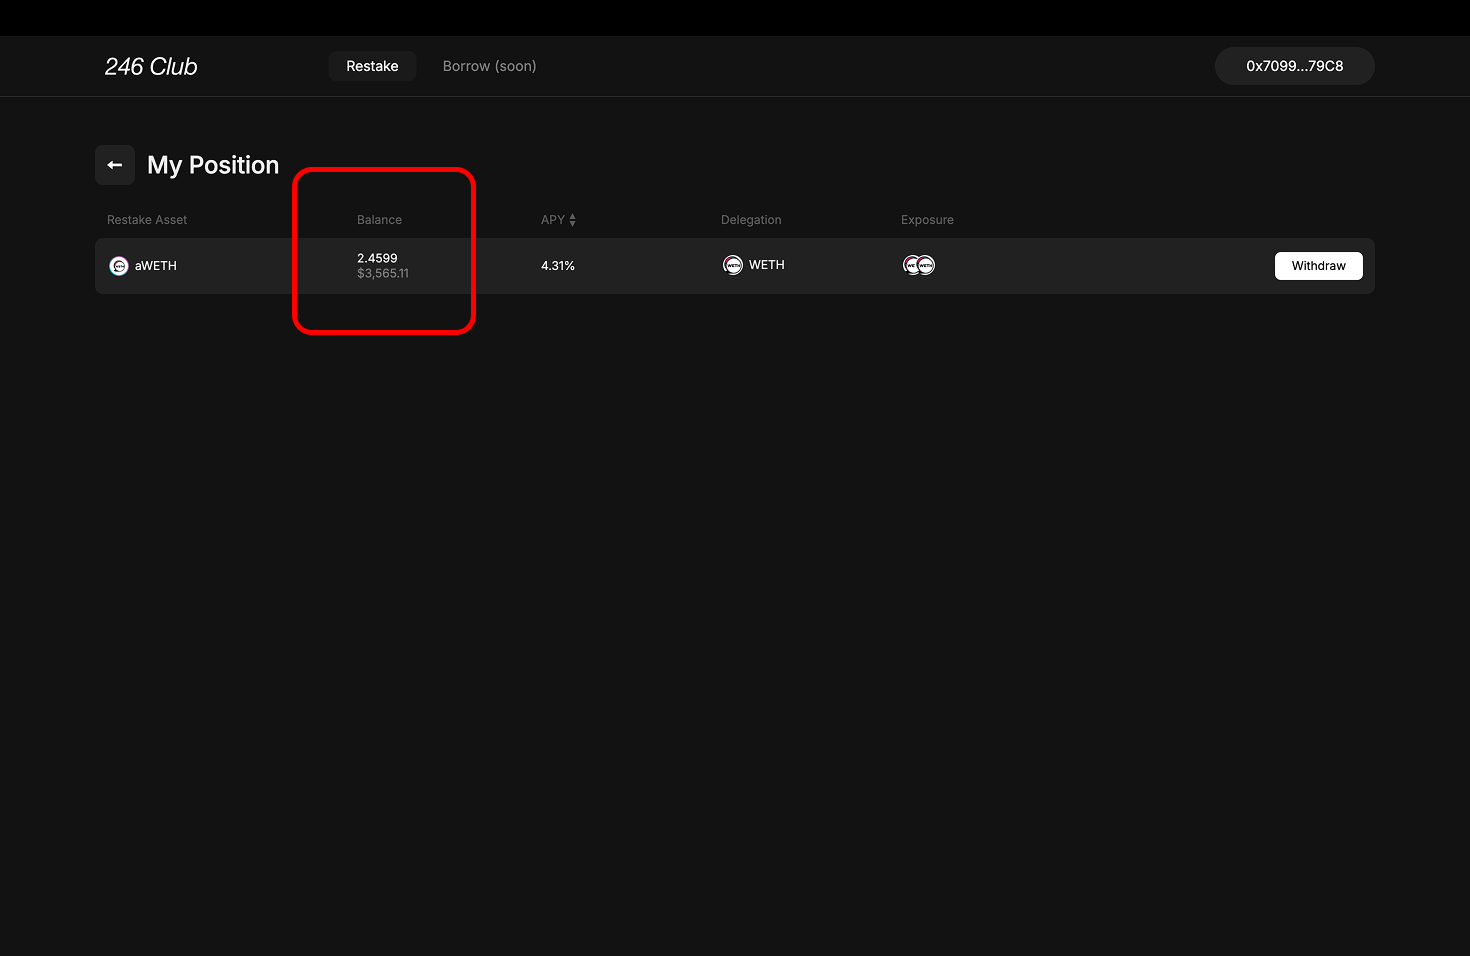
- The collateral and borrow assets in each position
- Your current Net APY
- Your real-time LTV
The LTV bar changes color based on risk:Learn more about managing loan positions
- Green: Safe
- Orange: Moderate risk
- Red: Close to liquidation
Managing My Position
You can manage your position through four actions:- Supply: Add more collateral
- Withdraw: Remove part of your collateral
- Borrow: Borrow additional funds
- Repay: Reduce your borrowed amount
Supply ( Collateral ) Modal
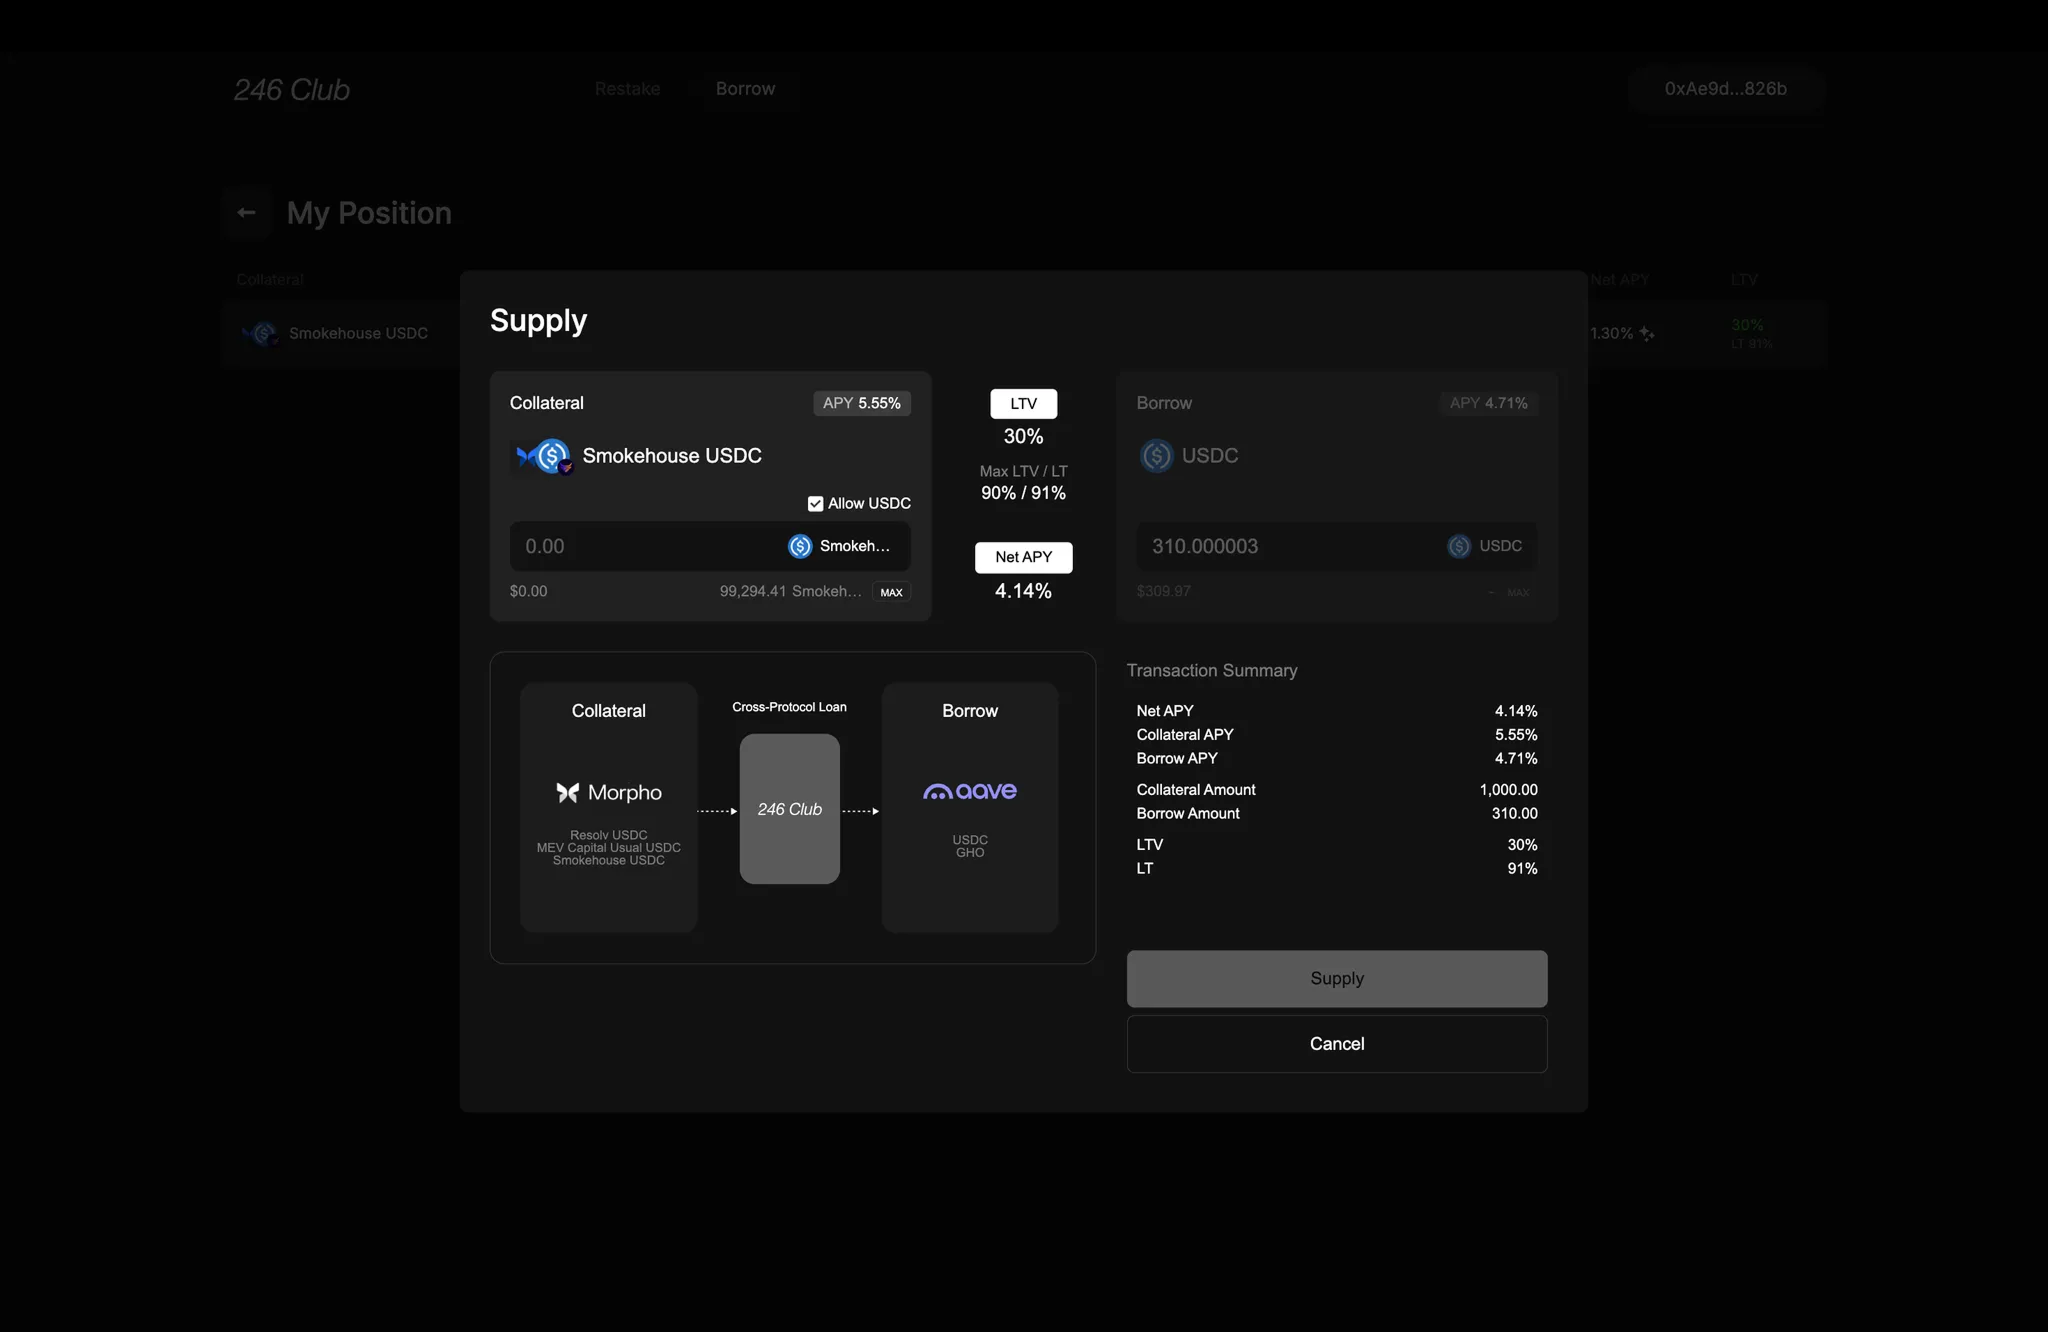
- Existing vault position
- Underlying asset (if enabled)
- Collateral total
- LTV
- Net APY
Withdraw ( Collateral ) Modal
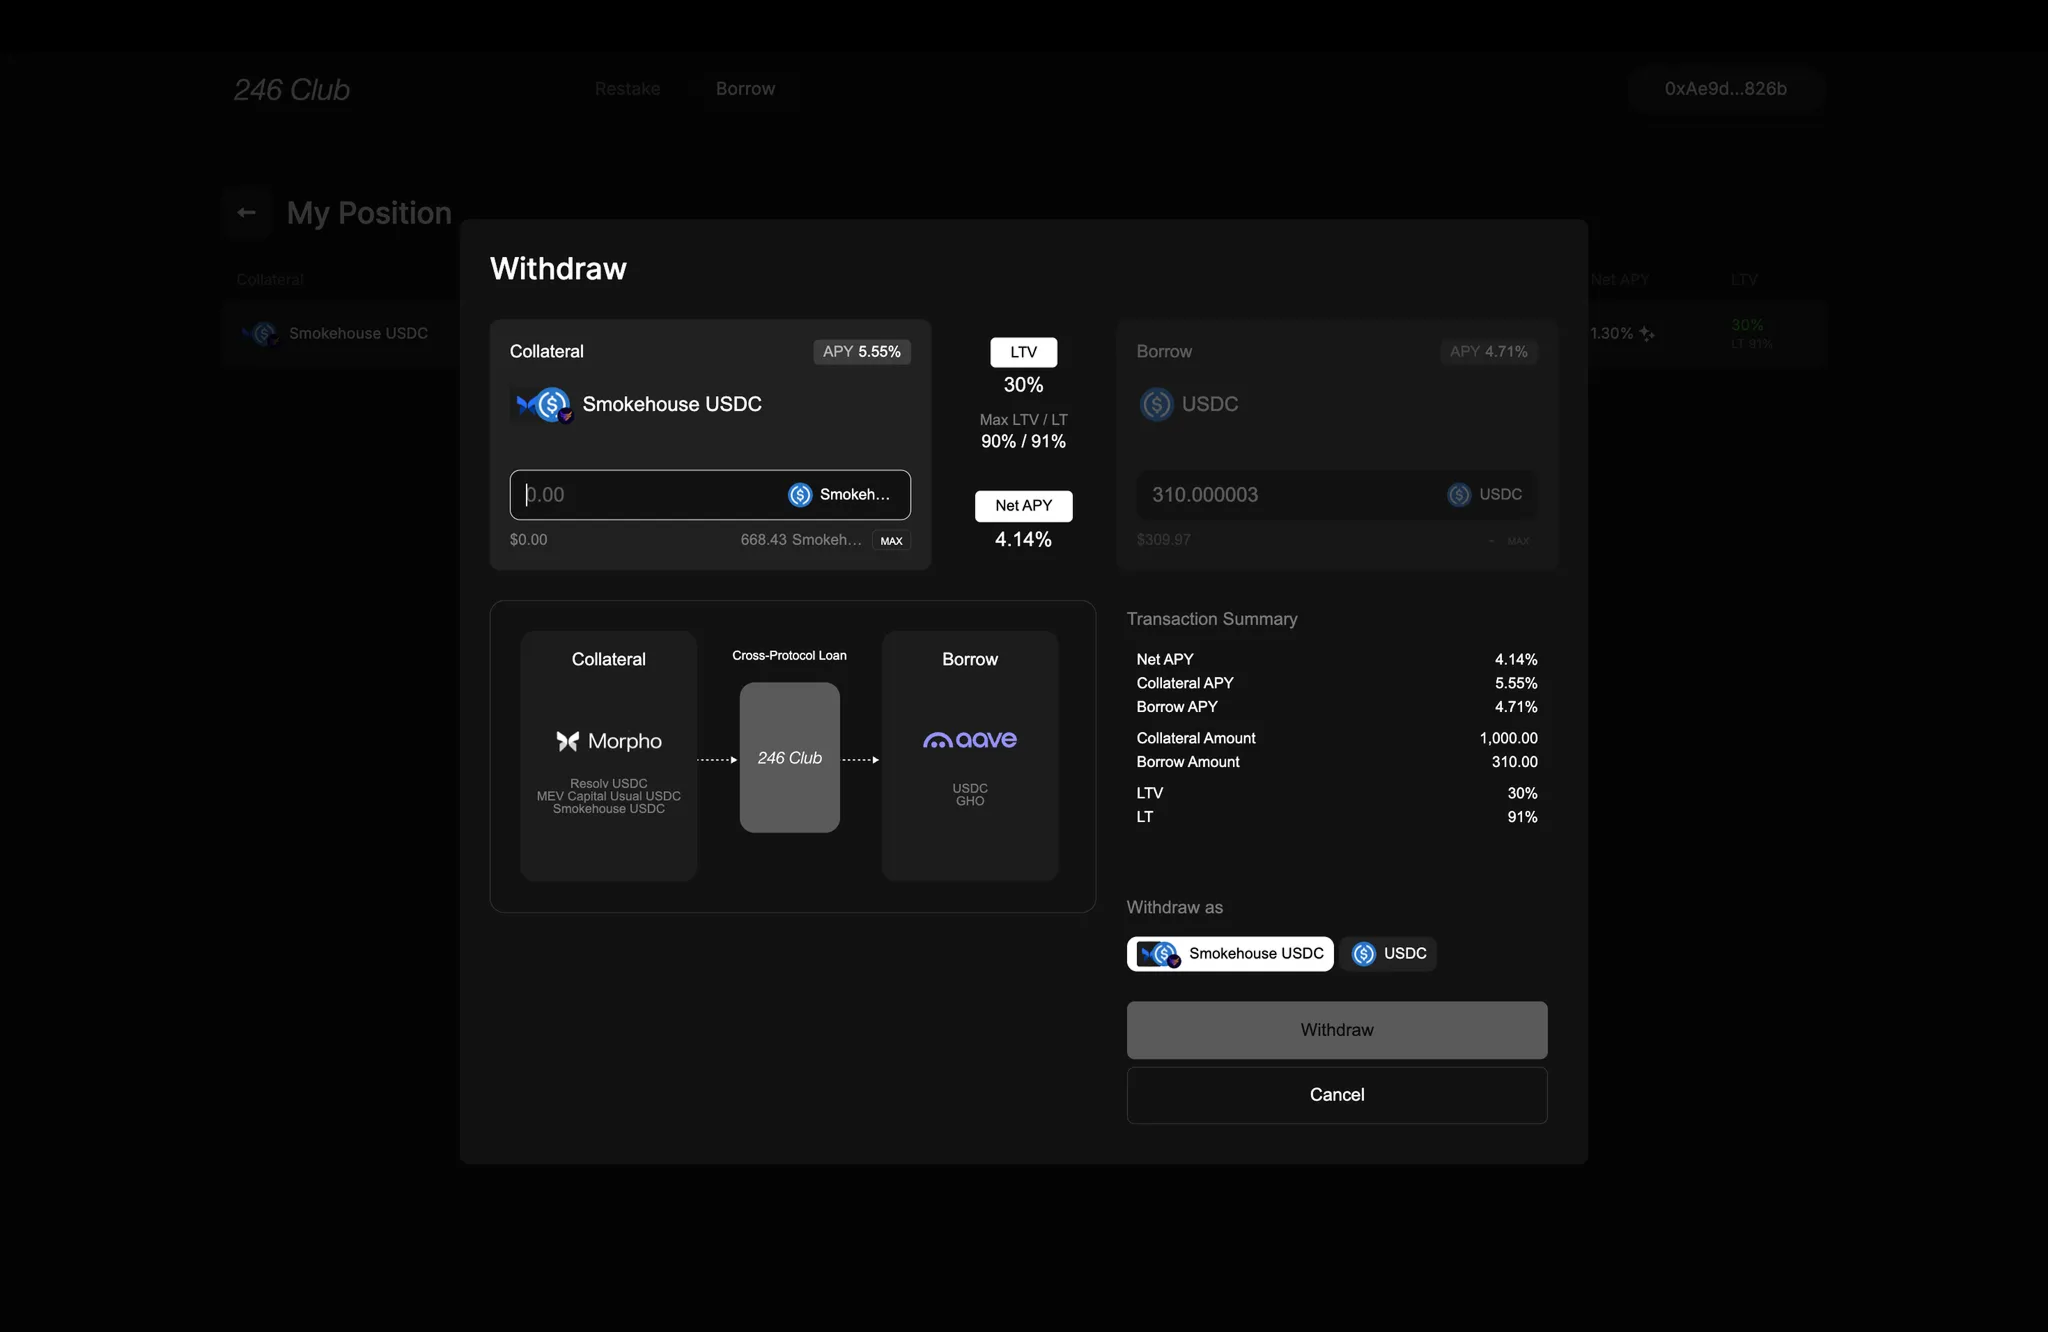
- New Collateral Value
- New LTV
- Updated Net APY
Borrow Modal
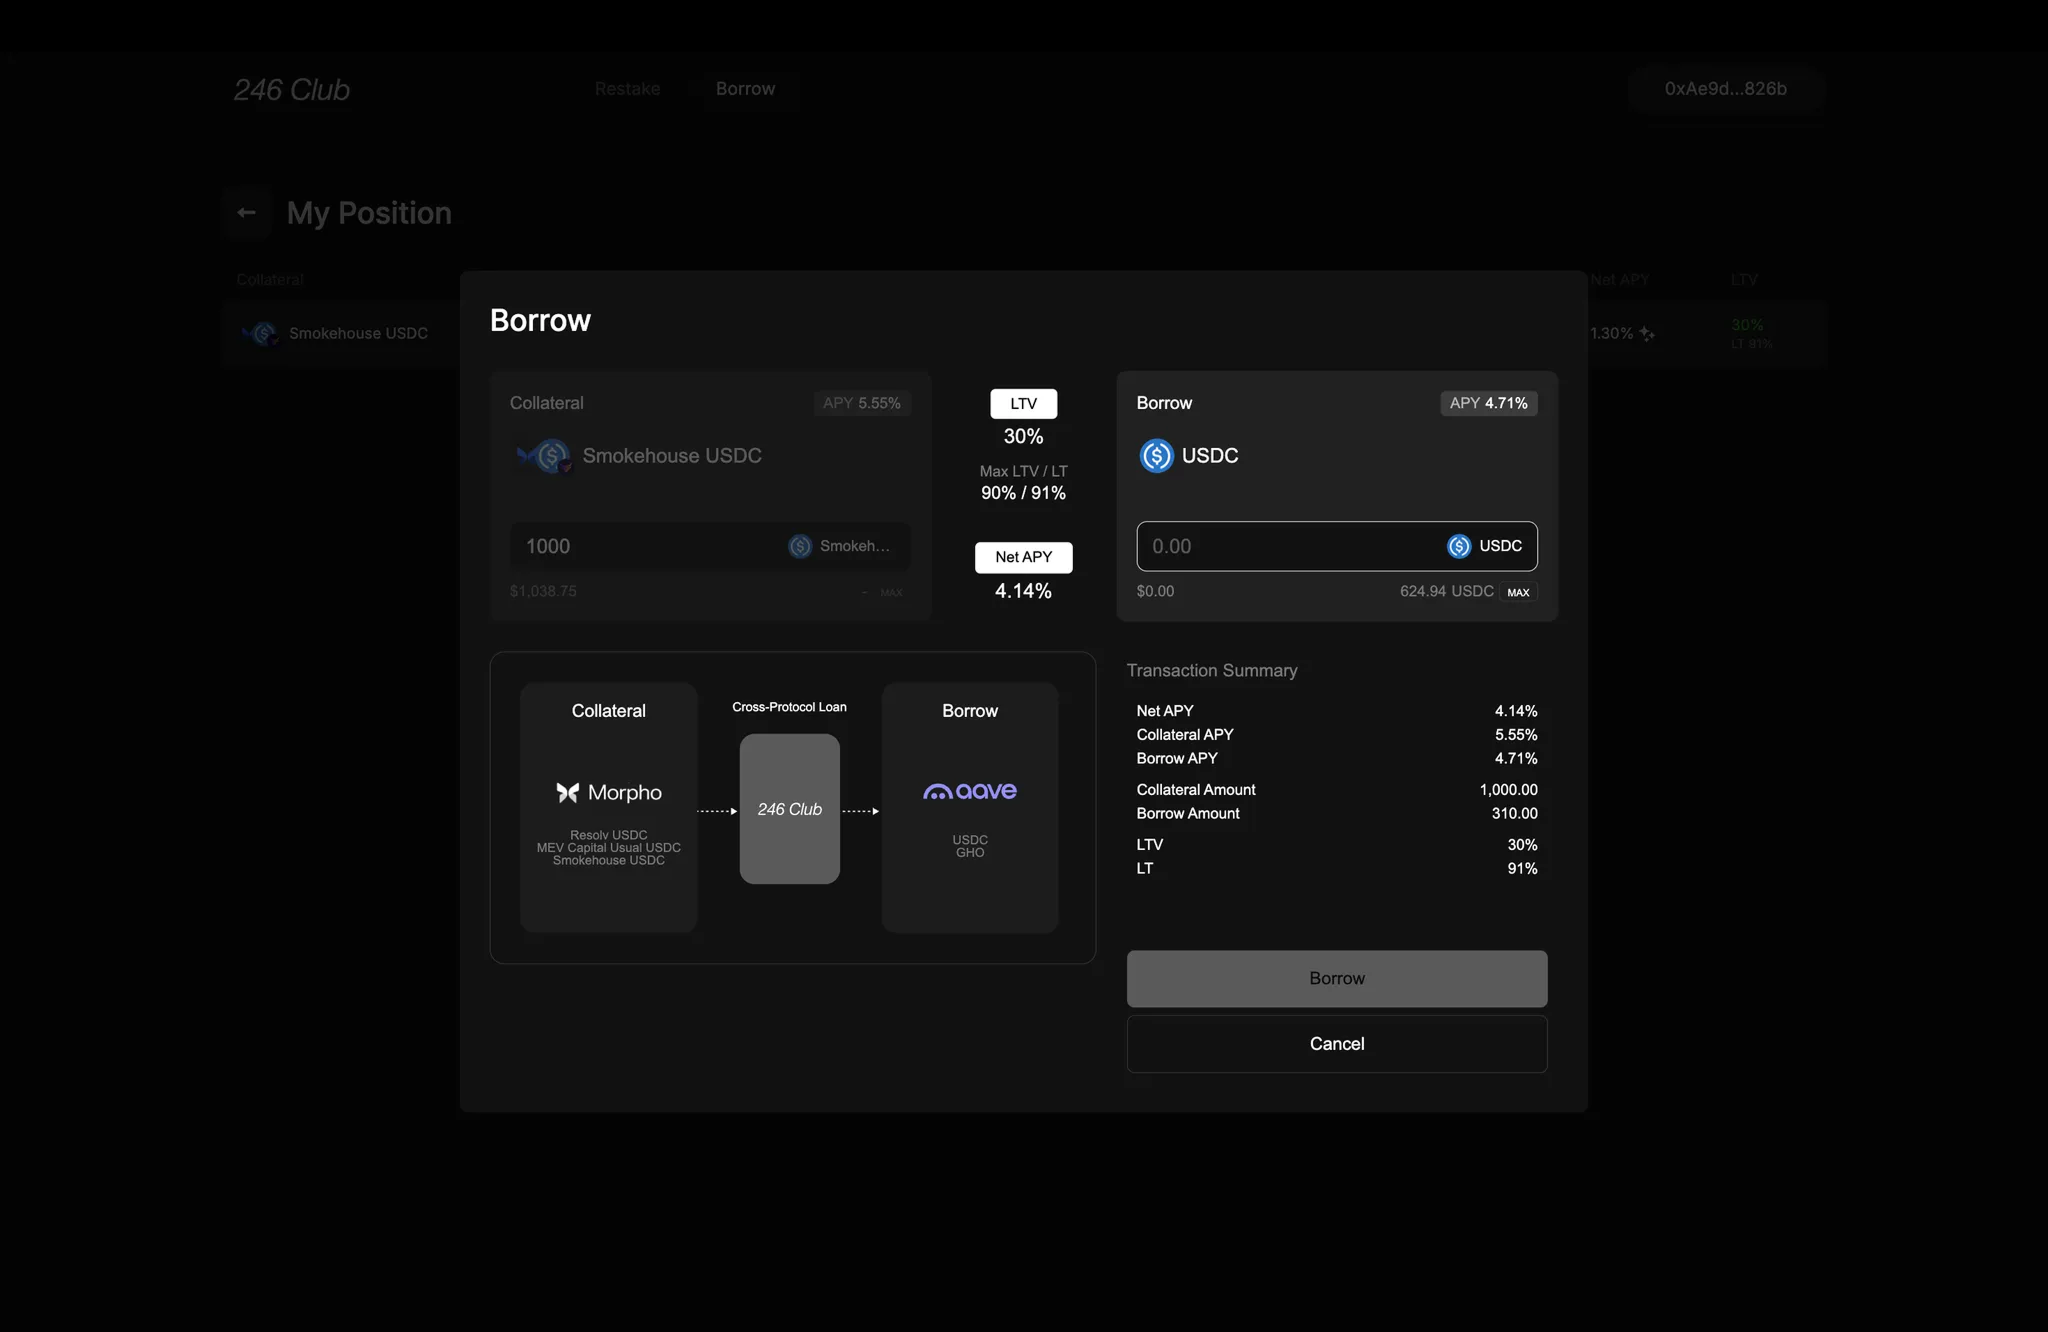
- The input field allows you to specify how much more of the borrow asset you’d like to take out.
- The Max button auto-fills the maximum additional amount you can borrow, calculated as: (Collateral Value × Max LTV) – Current Borrow Amount
- New Borrowed Amount
- New LTV
- Updated Net APY
Repay Modal
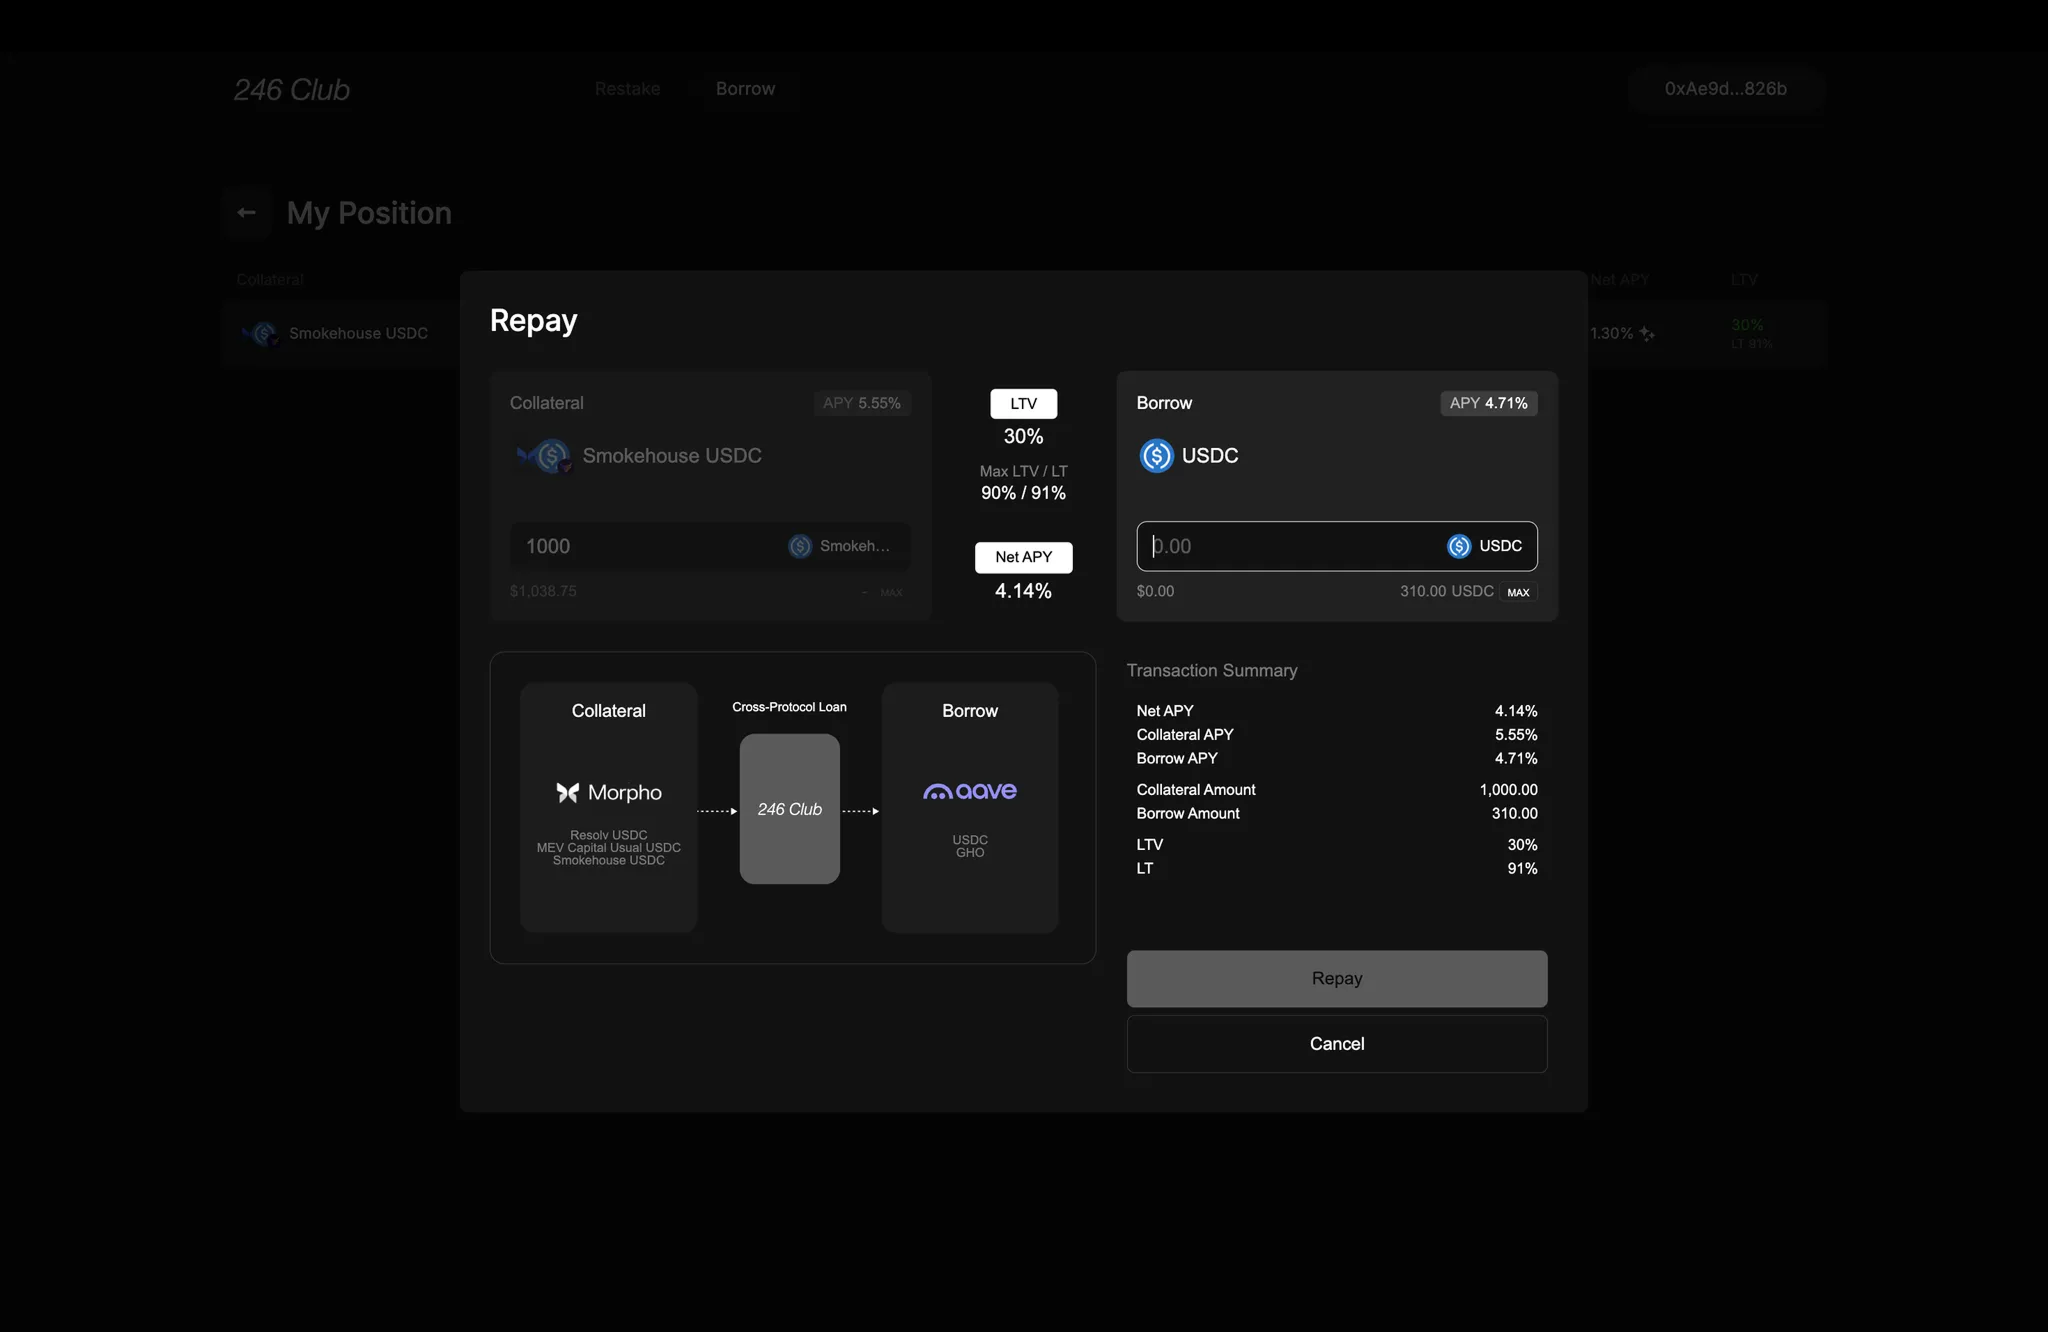
- You can input how much you’d like to repay.
- The Max button shows the lesser of:
- The full borrowed amount of your position
- The amount of borrow asset (e.g., USDC) available in your wallet
- Remaining Borrow Amount
- New LTV
- Adjusted Net APY
Repay Modal - Flash Repay
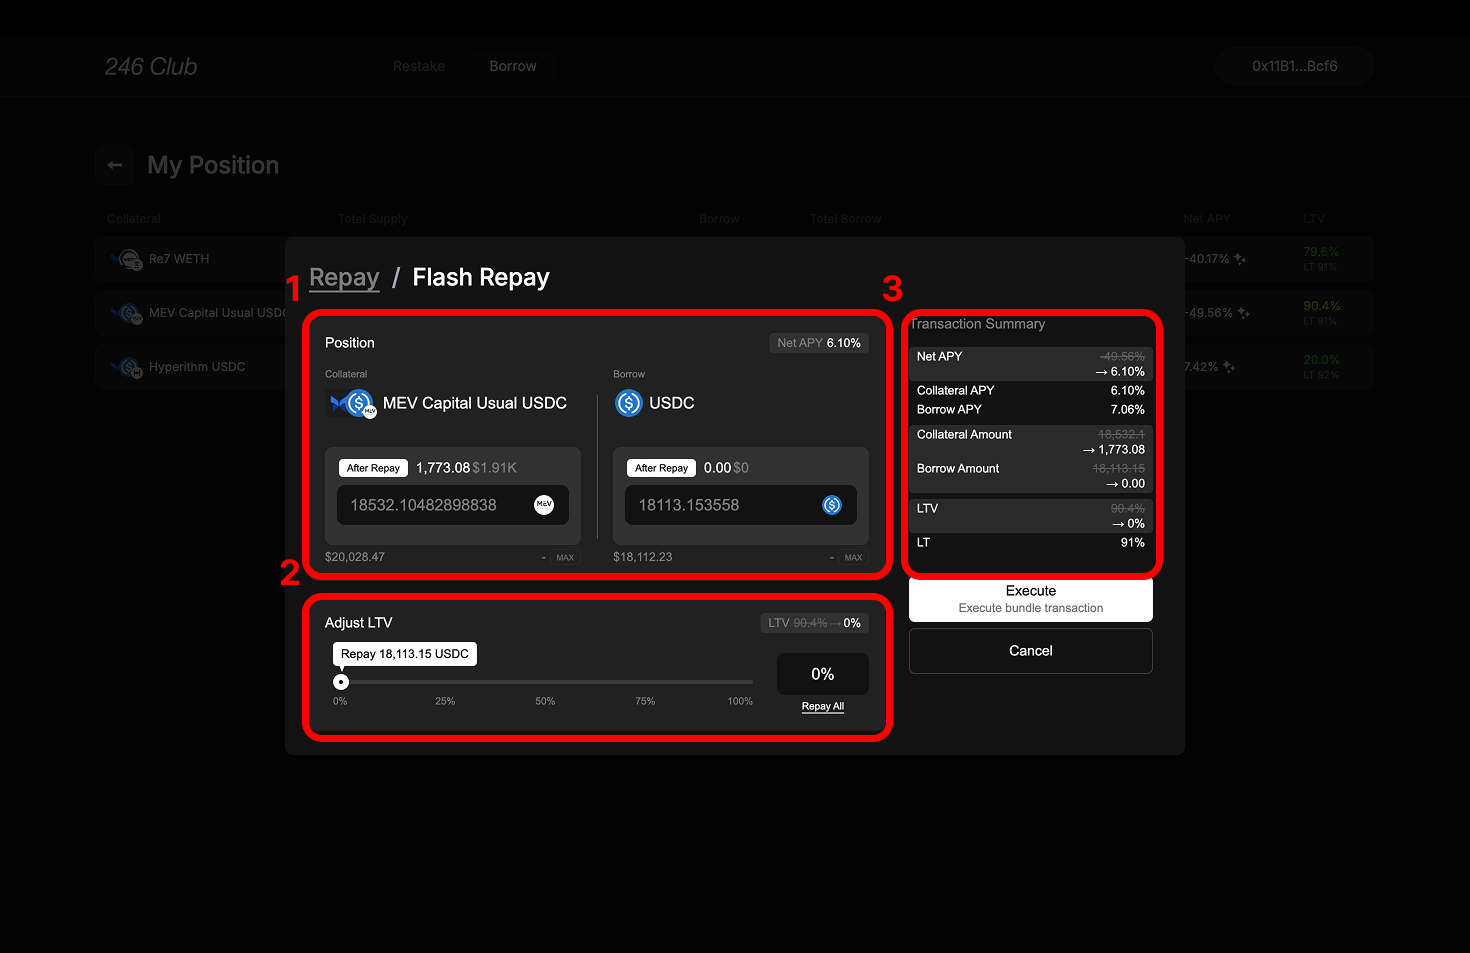
- Shows the selected collateral and borrow asset pair.
- Before any interaction, it displays the current Collateral Supplied and Amount Borrowed, along with the dollar value of each.
- After setting a target LTV using the Adjust LTV Box, the “After Repay” values are displayed, showing updated Collateral and Borrow amounts.
In Flash-Repay mode, you don’t manually input an amount. You simply set a target LTV, and the system automatically calculates the required collateral withdrawal and debt repayment.2. Adjust LTV Box
- Set your desired Target LTV using the slider — can only be set lower than your current LTV.
- Clicking Max sets your Target LTV to 0%, fully repaying your debt.
- Real-time updates reflect changes based on your selected Target LTV:
- Net APY
- Total Collateral Supplied (after accounting for the amount used to repay)
- Total Amount Borrowed
- Current LTV after Flash-Repay